
Recent Articles
Showing posts with label Blog. Show all posts
Showing posts with label Blog. Show all posts
Friday, May 09, 2014
Friday, May 09, 2014
- 0 Comments
How To Embed Your Web Pages to Facebook
Hello Friends Well guys let me tell you before proceeding to content!
You all know Facebook play a vital role in everyone's life
SO today I am here to share a good post for not only Fb users but also for those who have their own webpages.....
Lets Start//./.....


Facebook have various limitations but by this tutorial you can design any type of webpage (newsletter forms, sales page, etc.) with full flexibility of other type of scripts, Videos, Images, audio, etc. So, you have full flexibility to design any type of webpage you want and embed it inside Facebook.

As, this workaround works on the custom tabs of Facebook pages, so you are required to have a Facebook fanpage and a website where you’re hosting your HTML webpage.
Step 1: Login to your Facebook account. Now, open Static HTML: iframe tabs on Facebook app and click on Add Static HTML to a Page.

Step 2: Now, a new tab/window will appear and ask you to choose your Facebook page. Select the desired Facebook page where you want to embed your webpage and click ‘Add Page Tab’. It will add a custom tab to your selected fanpage.

Step 3: Now, move to your Facebook page. Here, you’ll find a new custom tab added, named ‘Welcome’. Click on it. (Check the boxes right to your page’s description).

Step 4: Now, on the next page, click on “Edit Tab”.

Step 5: Now, you will see a code editor. However, if you want, you can add your HTML code here but it is required for you to add stylesheet and javascript files too. So, its better to go for default HTML template provided here by clicking on “Choose an HTML template” or click on See more apps if you want to add a webpage of your website.

Step 6: From the next opened page, choose website from the left sidebar (under Free apps section) and click ‘Use Website App’.

Step 7: On the next screen, add your webpage’s URL address at the box saying “Web page address” (recommended: HTTPS). If you don’t want users to see a scroll bar (iFrame) for your embedded webpage on Facebook, tick the box ‘Remove scroll bar’ and options will appear to set page width and height. Fix page width and height by moving their respective sliders.

Preview your webpage below the settings. If you have changed something, lets say page zoom level or height, click ‘update preview’ option to watch fresh preview.

Step 9: Now, move to top of the settings page. Here are few options provided with the tabs. For example, Fangate will tell you how many visitors visited this page before liking your Facebook fanpage, Analytics will track how many visitors visited the page, from Settings, you can grab short link for your Facebook fanpage.
When you’ve done with these settings, click Preview tab to check if everything OK, click on “Save & Publish” button.

Step 10: Finally click on ‘Done editing tab’ when Save & Publish button will change to All saved.

Congratulations! You’re done. Now, go back to your fanpage and click “Welcome” custom tab. It is showing your embedded webpage now.
Click View as a visitor and then Open Visitor Mode to check how it is appearing for your visitors.
Now, enjoy sharing this page’s Facebook link (or short link, that you might have copied in step 9 or 10) with your friends and fans and convert Facebook users straight on Facebook.
It you found this article helpful then please consider sharing it with your friends on social networks :-)
So Friends Hope you all enjoyed this useful post!
Thanks for reading it!!!!- By Digi Hackers Team
You all know Facebook play a vital role in everyone's life
SO today I am here to share a good post for not only Fb users but also for those who have their own webpages.....
Lets Start//./.....
Facebook is having enormous amount of targeted customers for every type of brands. Whether your company is a web design company, a online retailer shop, a tourism association, a public entertainer, a fashion organization or related to any other field like food & drinks, gaming, automobiles, matrimonials, etc. at Facebook, you can find thousands of customers for your service.
But, the main problem arises is to drive them “out” of the Facebook to your external website and convert them. As, maximum people who visit Facebook, visit this social network more to get entertained and less to get information, it becomes quite difficult to drive them out of the Facebook. So, you might have seen that the story posted straight on the Facebook attracts more visitors, comments and likes instead of the story for which you’ve provided link (to some external website).
So, why not to convert users straight on Facebook?
Yes! you can convert them not just to get Facebook-related benefits such as likes, shares, comments, etc. but you can actually make Facebook users subscriber to your blog/product/service, customer to your services, make them shop your products “straight” on the Facebook (without visiting any external website). 
And friends, I am not talking about any automated Facebook app that lets you to add subscribers form, payment options, etc. instead I am going to teach you how you can embed your website or webpage to Facebook.
To be more specific, we are going to utilize Facebook Fanpage’s custom tab. You’ll get an idea by check these embedded HTML pages of Best Friends Animal Society: Donate Page, Adopt Page and Volunteer Page.
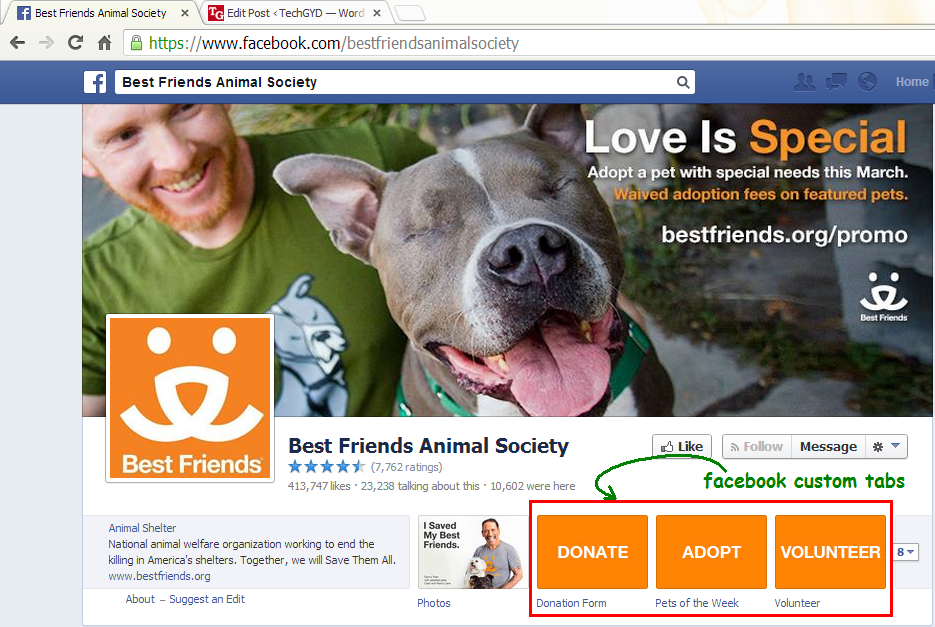
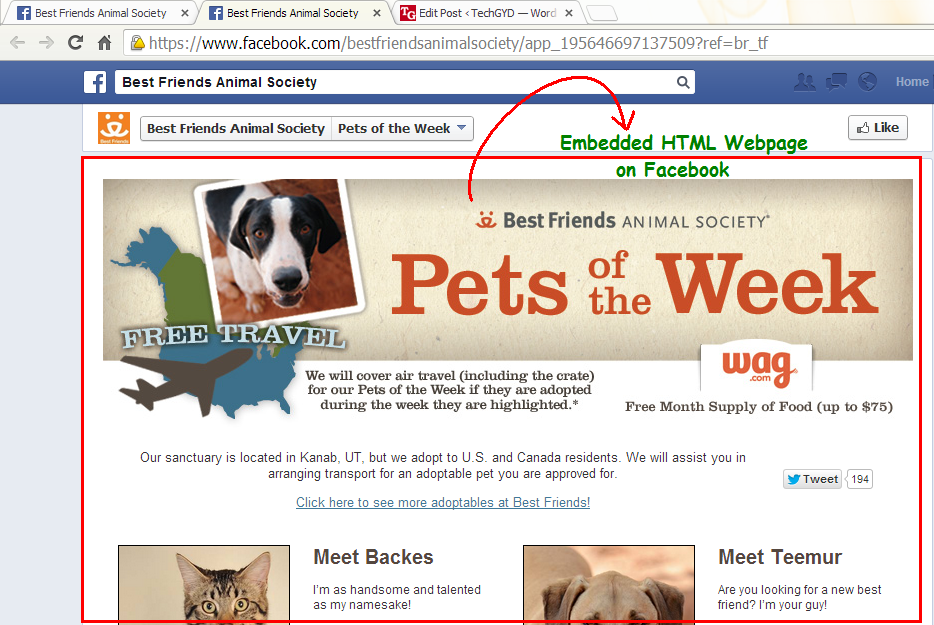
As, this workaround works on the custom tabs of Facebook pages, so you are required to have a Facebook fanpage and a website where you’re hosting your HTML webpage.
Steps To Embed Webpages on Facebook
Step 1: Login to your Facebook account. Now, open Static HTML: iframe tabs on Facebook app and click on Add Static HTML to a Page.
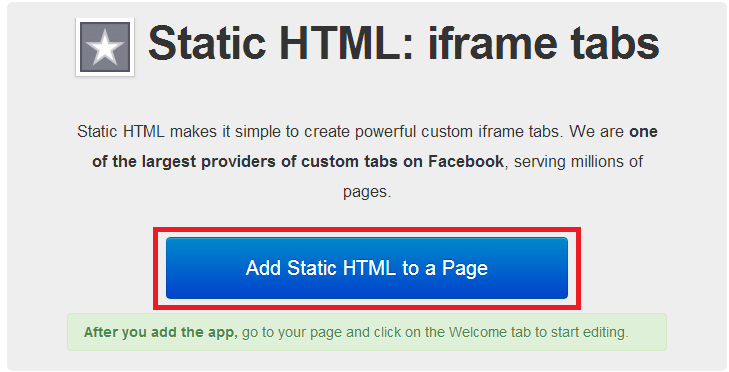
Step 2: Now, a new tab/window will appear and ask you to choose your Facebook page. Select the desired Facebook page where you want to embed your webpage and click ‘Add Page Tab’. It will add a custom tab to your selected fanpage.
Step 3: Now, move to your Facebook page. Here, you’ll find a new custom tab added, named ‘Welcome’. Click on it. (Check the boxes right to your page’s description).
Step 4: Now, on the next page, click on “Edit Tab”.
Step 5: Now, you will see a code editor. However, if you want, you can add your HTML code here but it is required for you to add stylesheet and javascript files too. So, its better to go for default HTML template provided here by clicking on “Choose an HTML template” or click on See more apps if you want to add a webpage of your website.
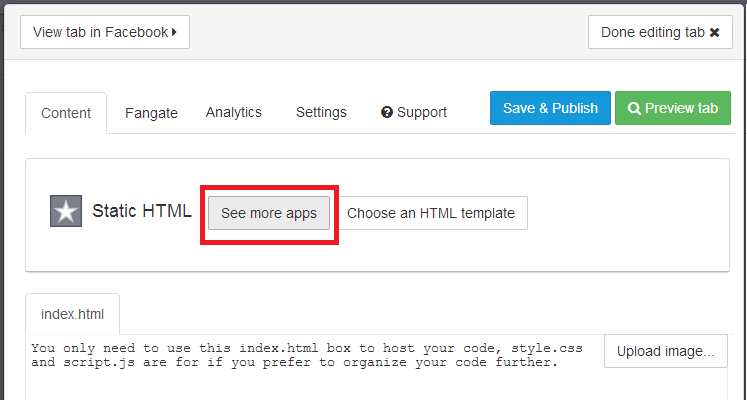
Step 6: From the next opened page, choose website from the left sidebar (under Free apps section) and click ‘Use Website App’.
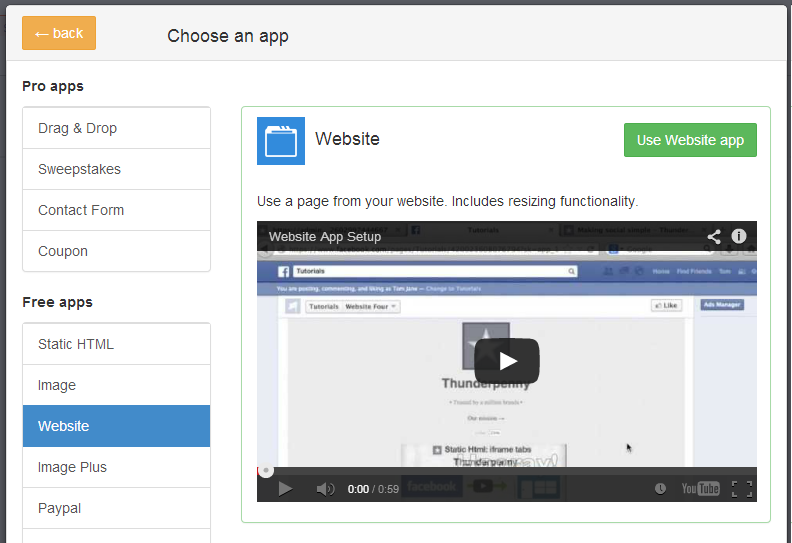
Step 7: On the next screen, add your webpage’s URL address at the box saying “Web page address” (recommended: HTTPS). If you don’t want users to see a scroll bar (iFrame) for your embedded webpage on Facebook, tick the box ‘Remove scroll bar’ and options will appear to set page width and height. Fix page width and height by moving their respective sliders.
Preview your webpage below the settings. If you have changed something, lets say page zoom level or height, click ‘update preview’ option to watch fresh preview.
Step 9: Now, move to top of the settings page. Here are few options provided with the tabs. For example, Fangate will tell you how many visitors visited this page before liking your Facebook fanpage, Analytics will track how many visitors visited the page, from Settings, you can grab short link for your Facebook fanpage.
When you’ve done with these settings, click Preview tab to check if everything OK, click on “Save & Publish” button.
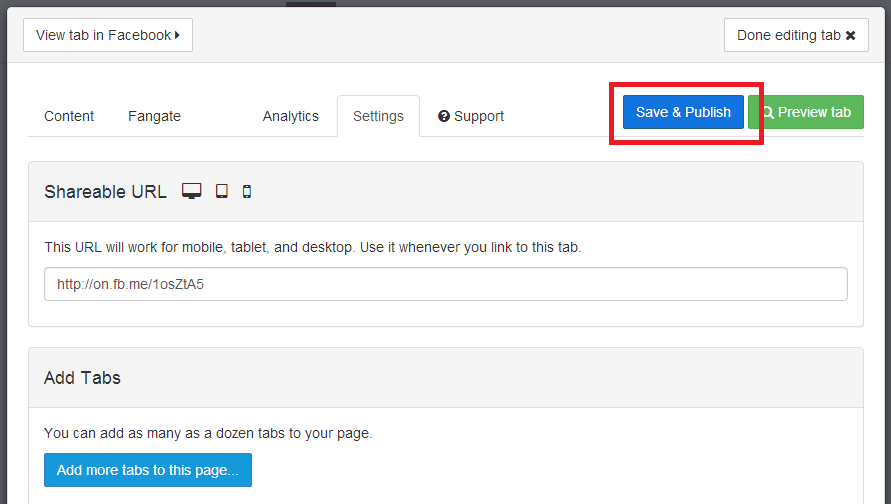
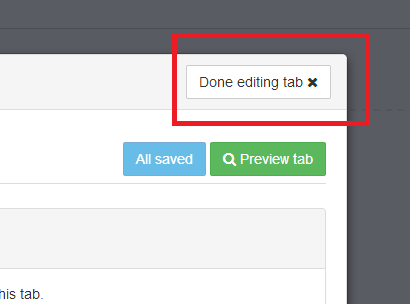
Step 10: Finally click on ‘Done editing tab’ when Save & Publish button will change to All saved.
Congratulations! You’re done. Now, go back to your fanpage and click “Welcome” custom tab. It is showing your embedded webpage now.
Click View as a visitor and then Open Visitor Mode to check how it is appearing for your visitors.
Now, enjoy sharing this page’s Facebook link (or short link, that you might have copied in step 9 or 10) with your friends and fans and convert Facebook users straight on Facebook.
This is just a sample, so I just used Digi Hackers’s Home page. To actually convert visitors, you’re supposed to use your subscribers/newsletter form, sales page or any other landing pages.
It you found this article helpful then please consider sharing it with your friends on social networks :-)
So Friends Hope you all enjoyed this useful post!
Thanks for reading it!!!!- By Digi Hackers Team
Tuesday, May 06, 2014
Tuesday, May 06, 2014
- 0 Comments
HELLO READERS,I AM BACK WITH A
NEW TRICK WHICH WILL TELL YOU HOW TO DOWNLOAD YOUTUBE VIDEO WITHOUT ANY
SOFTWARE.
SOMETIMES IF YOU HAVE TO DOWNLOAD ANY VIDEO ON YOUTUBE SO YOU NEED A SOFTWARE CALLED YOUTUBE DOWNLOADER.BUT I AM HERE TO SHARE A TRICK BY WHICH YOU CAN DOWNLOAD YOUTUBE VIDEOS WITHOUT ANY SOFTWARE.AND MY TRICK NAME IS THE “SS” TRICK.SO HERE WE GO……………………….!
SOMETIMES IF YOU HAVE TO DOWNLOAD ANY VIDEO ON YOUTUBE SO YOU NEED A SOFTWARE CALLED YOUTUBE DOWNLOADER.BUT I AM HERE TO SHARE A TRICK BY WHICH YOU CAN DOWNLOAD YOUTUBE VIDEOS WITHOUT ANY SOFTWARE.AND MY TRICK NAME IS THE “SS” TRICK.SO HERE WE GO……………………….!
STEP#1:-FIRST OPEN WWW.YOUTUBE.COM

|


|
STEP#4:-
HIT ENTER A NEW PAGE WILL OPEN BY WHICH YOU CAN DOWNLOAD YOUTUBE VIDEO IN
FLV,MP4,WEBM,3GP,AUDIO MP4 FORMATS

ENJOY…………
NOTE:-THIS TRICK ALSO WORKS
IN THE FOLLOWING SITES


How To Create Free eBooks of Important WikiPedia Articles or Pages
Hello Friends Welcome back to Digi Hackers.
Well Friends till this time we always had given you info-graphics or free full version downloads but guys have ever wonder what can you do with famous website Wiki Pedia else than just reading Articles ??/
Today I am going to share a good post by which you can download those articles or pages in form of ebooks for free!!
As you all know friends Wikipedia is very powerful tool which almost every Internet users use. Holding vast information on each and every topics, it has become most popular place to get details for any project, assignment, or topic. The website put readers at the top and provide only important stuffs.
It may happen then when you bounced at the website for one topic or two, you found many related and very important articles which you want to save at your PC or smartphone for later reference.
So, if you want to save some important webpages of wikipedia, copying its content and saving it on document file or saving the entire webpage in .html, .htm etc. it would be great to create a eBook for those webpages. Today, I am telling you how you can create free and powerful eBooks of your favorite Wikipedia webpages. Follow this tutorial.
 |
| A example of the ebook you will get after following the tutorial |
Create Free eBook of Wikipedia Pages
Step #1: Whenever you visit an article, from the left sidebar choose Print/Export then Create a Book option. This option will redirect you to Book Creator Page

Step #2: On book creator page, click on green button of Start Book Creator. By activating this feature, you will be able to collect wikipedia articles to create an ebook for you.

Step #3: Now, whenever you visit any wikipedia webpage, below the article’s title, you’ll find the option “Add this page to your book” with a green ‘+’ button. Just click it to add the article to your ebook. You can also click on Suggest pages which will show you most relevant and important pages, based on your current selection.

Tip: When you hover any link of wikipedia articles, it will show you an option to add linked page to your Wikipedia articles without visiting the article. You can also all the pages of a specific category by visiting the category page.

Step #5: When done, visit Manage your book link. By this page, you can add/remove articles from your book. Visit the articles, move them up or down in your book and finally Name by putting relevant title and subtitle.

Step #6: From the option provided at right side of the same page, you can download your just created eBook in PDF, ePUB, word-processor (Open document) and Kiwix (OpenZIM) formats for Free.

You can also order a printed book of your selection at very low price which will be printed by PediaPress and shipped within 2-3 business days. You can specify title, design, cover and more.

Image Source : - Wiki Pedia
Ok So friends I hope you will get a lot of help from this post
Thanks Be connected for more latest information and downloads
Share this on Facebook Now to help us broader our community
Let Us Know
How A Website Looked In Past
Hello Friends Welcome back to Digi Hackers
In Last Post My mate told you all about How To Get File Ice Application Approved Easily
And Today I am going to tell you all a simple Browsing Trick with which you all can see How a Website (e.g Facebook) looked in the past few years
Fortunately, there is a cool web tool out there to track history of a website. And, the web tool is Internet Archive: Wayback Machine.

Have you ever gone interested to know how a website looked when it was started?
I know, many of you (especially bloggers) are curious to lookback design of many websites. Many of you are excited to know how a website for e.g., Google, Facebook, Twitter, Wikipedia, eHow, Amazon evolved. What were starting layouts of their website, what changes they have done on their website’s look, to enhance its performance, etc.
I am also very excited to know lookback of some of my competitor’s websites and some very big blogs to know their strategies they’ve implemented on starting of their websites because of which they’re so much successful now.
Fortunately, there is a cool web tool out there to track history of a website. And, the web tool is Internet Archive: Wayback Machine.

What is Internet Archive: Wayback Machine?
For many of you guys, Internet Archive: Wayback Machine can be a new term. It is digital archive of all the web that saves webpages of websites over time in its database so that they can be accessed in future to get important details. Wayback Machine has already saved over 391 billion webpages in its database.
To view history of any website/webpage, just enter its URL in the provided search-box atInternet Archive: Wayback Machine and it’ll let you explore all the webpages saved about that specific webpage/website in its database from the starting of time.
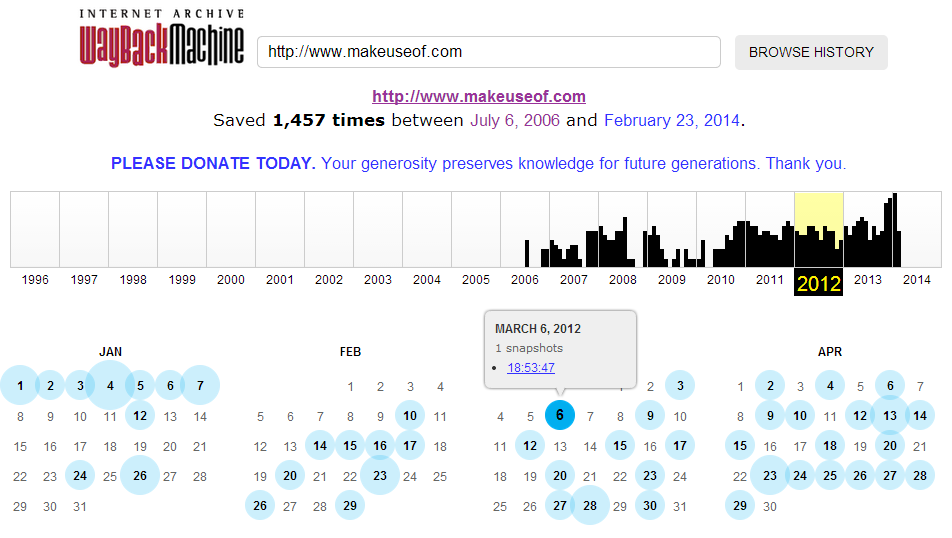
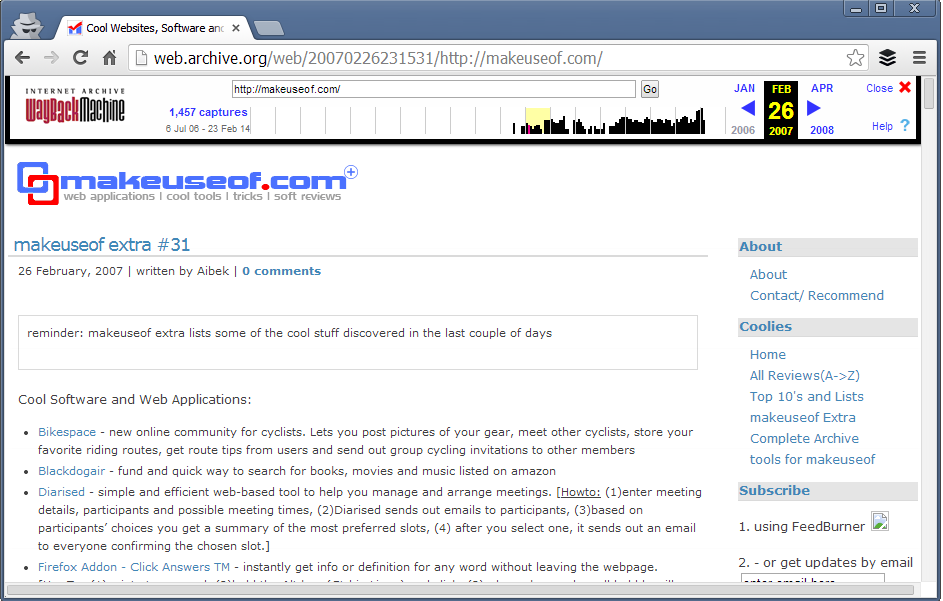
So Freinds Above , As you can see, for MakeUseOf.com, Internet Archive: Wayback Machine has saved total of 1,457 editions from July 6, 2006 (the day, this site started) till February 23, 2014 (now). Just choose year from the above graph and wayback machine will serve you all the saved webpage’s editions for each and every month, depending on How frequently the page modified, how much popular the site is, how many people saved its webpages at Internet Archive and more.
Just choose any of these and you would be able to check how that website (in this example, MakeUseOf.com) looked in past. So, this is how MakeUseOf looked like in Feb 26, 2007:
 |
| Browse MakeUseof History YourSelf |
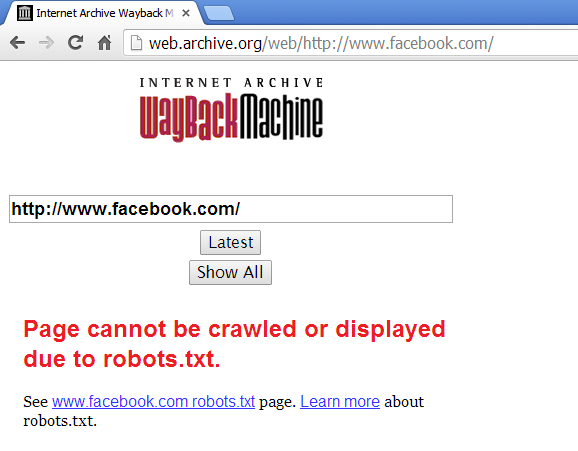
You can search for any website on this web archive tool and if the site has not blocked access to crawlers from robots.txt, you’ll be able to track their history. For example, Facebook has blocked its crawling from Robots.txt so, searching Facebook.com in this Internet Archive resulted in:
 |
| A Example Above |
These webpage editions that Internet Archive: Wayback Machine saves aren’t just snapshots, these all are real webpages.
So, if you want to get code, elements from any website’s previous layout, you this web tool will help you to get that.
Browsing history of successful websites in your blog’s niche will surely inspire, motivate and lead you in correct direction. Sometimes, when I get free time, I browse my competitor but very big blogs. It inspires me a lot. Even, tracking history of your own website is also quite adventerous and motivational.
Try Internet Archive: Wayback Machine, I’m sure you’ll love this awesome service 
Thanks Friends For Reading This Article and Now start watching the popular page's history!!
Sunday, May 04, 2014
Sunday, May 04, 2014
- 0 Comments
Web Designer vs. Web Developer [Who is Best?]
Hello Friends Welcome back to Digi Hackers.
Well friends You all know i mostly share any download or good information about your *uses* only!!
But friends as being a Programmer™ [Designer & Developer]

Well if you want the answer then you are at right place!!
Guys today I'll tell you what is the difference betn A Web Disigner and A Web Developer!
Well friends You all know i mostly share any download or good information about your *uses* only!!
But friends as being a Programmer™ [Designer & Developer]
I believe that everyone should know about it. Well did you notice that?? [Designer & Developer] ??? May be you are thinking both are the same but guys its not!!!!
Now the Problem arise if they both are not same then what are they? What is the difference?? What both do???
Well if you want the answer then you are at right place!!
Guys today I'll tell you what is the difference betn A Web Disigner and A Web Developer!
Saturday, May 03, 2014
Saturday, May 03, 2014
- 0 Comments
Latest Top Ten Blogger Professional Templates For Free [Tech + Games - 2014]
Hello Friends hope you all are fine !!
So friends today i want to ask you and to all our readers + bloggers that what you except from your blog ???
Of course a good rating and huge number of fans and views and ranking and etc.. etc..
SO LETS START....
1) Business First

3) BlackBlue

Download Here Live Demo
4) Game Black
So friends today i want to ask you and to all our readers + bloggers that what you except from your blog ???
Of course a good rating and huge number of fans and views and ranking and etc.. etc..
Ok then let me tell you a truth that Every blog is firstly judged from its look that is Its Template !~!So Friends today i will share some of the good or i can say best templates for you for free
SO LETS START....
1) Business First
Business First is a free Blogger template for business and tech related blogs and websites. The two color blogger makes it so simple and very interesting. It has left and right sidebar.
The background is gray and the header is black. Business First theme has 2 menus, first menu is for pages and second menu is for categories.
Business First template has by default pages on menu, but also you can add and custom links, since blogger support it.

Business First is a free Blogger template for business related blogs and websites. The two color blogger makes it so simple and very interesting. It has left and right sidebar.
The background is gray and the header is black. Business First theme has 2 menus, first menu is for pages and second menu is for categories.
Business First template has by default pages on menu, but also you can add and custom links, since blogger support it.
Features:
Featured Slider-Show Content – to show your favorite post above the content, simple to edit from blogger panel
Ads banners ready – monetize your site, accepted Google ads and any HTML / script code
Popular posts in sidebar with thumbnail
Social icons, easy to edit through option panel
Colors – white, gray
2) Black Forme


BlackForme is Blogger template for tech or business related sites. This template has 2 columns and 3 other columns in footer, lot of place to put your widgets. This is the most simplest template ever. The background is all grey with black header. It is suitable for everything that you want to use it. Recommended for tech or business blog.
BlackForme template has by default pages on menu, but also you can add and custom links, since blogger support it.
Features:
Featured Slider-Show Content – to show your favorite post above the content, simple to edit from blogger panel
Ads banners ready – monetize your site, accepted Google ads and any HTML / script code
Popular posts in sidebar with thumbnail
Social icons, easy to edit through option panel
Colors – grey, black

Black Blue is Blogger template for tech or business related sites. This template has dark blue color at the background, and some sparkle of light spread on it. The header is totally black. It has 3 columns, left and right sidebar.
This template is very simple and in it’s complex you can use it for business or for your high technology stuff. Recommended for business or tech blog.
Black Blue template has by default pages on menu, but also you can add and custom links, since blogger support it.
Features:
Featured Slider-Show Content – to show your favorite post above the content, simple to edit from blogger panel
Ads banners ready – monetize your site, accepted Google ads and any HTML / script code
Popular posts in sidebar with thumbnail
Social icons, easy to edit through option panel
Colors – black and blue
4) Game Black

Game Black is Blogger template for games related sites.
This theme is very complicated at the very first site but if you look closely you will find that everything has their perfect spot.
Basically this theme is designed for those persons who like playing games because at the background you will see a battle field and at the center a soldier that is ready to take your command.
It has 3 columns, left and right sidebar. Recommended for games blog.
Game Black template has by default pages on menu, but also you can add and custom links, since blogger support it.
Features:
Featured Slider-Show Content – to show your favorite post above the content, simple to edit from blogger panel
Ads banners ready – monetize your site, accepted Google ads and any HTML / script code
Popular posts in sidebar with thumbnail
Social icons, easy to edit through option panel
Colors – black, gray, blue
5) Game Blue
Game Blue is a new, free Blogger template for fashion blog.
This template has 2 columns and 3 other columns in footer, lot of place to put your widgets. The background has a very special design that it looks like the insider of a computer or like a machine that is under your command.
So it has simple color that fit perfectly with each other. if you are addicted by games this is the right place for expressing your talent. Recommended for games blog. Have fun!
Game Blue template has by default pages on primary menu, but this template support WordPress menu, so you can easy edit them, and can place on same menu pages, categories and other links. Also, this template has and second menu for categories which are shown by default.
Features:
Admin Options V3 panel – which make it easy to customize your site
Featured Slider-Show Content – to show your favorite post above the content,simple to edit from admin option
Ads banners ready – monetize your site, accepted Google ads and any HTML / script code
Logo .PSD included – simple just edit the text through your Photoshop
Facebook and Twitter Widget enabled – Show your Facebook and Twitter friends
Popular posts in sidebar with thumbnail
Social icons, easy to edit through option panel
Colors –white, black,blue
Subscribe to:
Posts (Atom)